
How to Import/Export User Data
Overview
The Time Clock device supports USB-based import and export functionality, allowing administrators to manage user data efficiently. This includes downloading user data from the device to a USB drive or uploading data to the device from a USB drive.
Before You Begin
-
Make sure you have a USB drive that is properly formatted (preferably FAT32).
-
Insert the USB drive into the USB port of the Time Clock device before initiating the import/export process.
Export (Download) User Data from the Device
-
Press the “M” key on the initial screen to launch the Main Menu.
-
Use the ▼ key to scroll down and select USB Manager, then press OK.
-
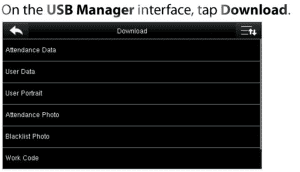
Select Download and press OK.
-
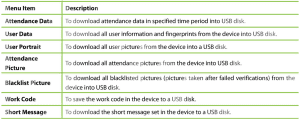
Use the ▼ key to choose the specific item to be downloaded (e.g., user data, attendance logs, templates).
- Press OK to confirm the export. The selected data will be saved to the USB drive.

Import (Upload) User Data to the Device
- Ensure the USB drive with user data files is inserted into the device’s USB port.
- Press the “M” key to open the Main Menu.
- Use the ▼ key to navigate to USB Manager, then press OK.
- Select Upload and press OK.
- Use the ▼ key to choose the item to be uploaded (e.g., user information, fingerprint templates).
- Press OK to begin the upload. Wait for the process to complete before removing the USB drive.
Import User Data to the NextGen Workforce
Importing user data manually into the NextGen Workforce system is quick and straightforward using the USB Manager utility. This is especially helpful when syncing employee profiles from a biometric time clock device to your online account.
Step-by-Step Instructions
- Log in to Your NextGen Workforce Account.
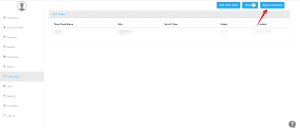
- Go to the Time Clocks Section (from the left-side navigation menu).
- Click “Import Manually” (top-right corner of the Time Clocks screen).
- Select the Target Time Clock.
- Upload the File
- Click the Choose File button and select the appropriate
.datfile previously downloaded from your device via USB.
- Click the Choose File button and select the appropriate
- Complete the Import
Important Notes
- Make sure the files are in the correct format supported by the device.
- You must first extract user data from the time clock using the USB Manager tool before importing it here.
- Always back up your user data before importing new data to avoid overwriting existing information.
- Avoid disconnecting the USB drive while upload/download is in progress.
Need Help?
If you encounter any issues, contact care@ngworkforce.com
📞 Support Link: NextGen Workforce Support.


