
How to Add a Time Clock to Your Online Account
Setting up a time clock in your online account allows you to track employee attendance accurately. Follow this guide to add a time clock, configure its settings, and ensure connectivity through Wi-Fi or Ethernet.
Before You Start
Ensure the following prerequisites are met before adding a time clock:
-
Online Account Setup: Your NextGen Workforce account should be created.
-
Employee Sync: Employees should be added or synced to the account.
-
Worksite Location: Define where employees can punch in.
For BambooHR Users: You can log in using your BambooHR credentials.
1: Adding a Worksite Location
Before adding a time clock, specify the worksite location for tracking attendance.
-
Log in to your account.
-
Go to Sites from the left-hand menu.
-
Click Add Sites (top right corner).
-
Fill out the site details.
-
Click Save.
To read an in detailed help article on How to create Sites, Click on the Link.
2: Adding a Time Clock
Check Device Information
Before adding the time clock, retrieve its MAC Address and Serial Number.
For STC500 Series Models:
-
On the physical device, go to:
Menu > System Info > Device Info
For Face Readers:
-
On the device, go to:
Menu > System Info > Device Info
Enable DHCP (Dynamic Host Configuration Protocol)
DHCP allows automatic network configuration.
-
On the time clock device, go to:
Main Menu > Connections > Ethernet > DHCP -
Enable DHCP.
Add the Time Clock to Your Online Account
-
Go to Dashboard > Select Time Clocks from the left-hand menu.
-
Click Add Time Clock.

-
Assign a Site to the clock.
-
Enter:
-
Time Clock Serial Number
-
MAC Address (include colons
:) -
Time Zone
-
-
Click Save.

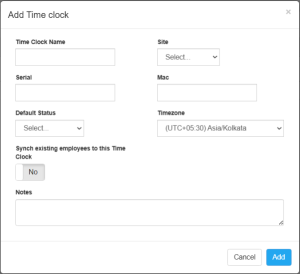
Tip: The system will handle punch patterns automatically, so ensure the default clock status is set to “Clocked In”.
3: Setting Up Time Clock with Wireless Connection (Wi-Fi)
Ensure you have the Wi-Fi network name (SSID) and password.
Wi-Fi Setup for Fingerprint/ID Readers
-
On the Time Clock Device, press “M” key to access the menu.
-
Select Comm > Wireless LAN.
-
Use arrow keys to select the Wi-Fi network, then press “M” again.
-
Enter the Wi-Fi password:
-
To enter letters, press
*and then the corresponding number key. -
To enter special characters, press
*twice.
-
-
Enable DHCP or enter a Static IP manually.
-
Scroll down to select OK, then press OK to save.
-
Press Esc three times to exit.
-
Restart the time clock by holding the power button.
-
Verify connection:
-
Press M > Comm > Wi-Fi Setup.
-
You should see the IP Address, NetMask, and Gateway.
-
-
Set Ethernet IP Address to 1.0.0.0:
-
Press M > Comm > Network > IP Address > 1.0.0.0.
-
Restart the device.
How to Check Network Connection
-
On a Windows computer, open Command Prompt (
cmd). -
Type:
-
If you receive a successful ping, the clock is online.
4: Setting Up Time Clock with Ethernet (Wired Connection)
-
Connect an Ethernet cable to the time clock.
-
Restart the time clock.
-
Wait 3 minutes and check the time clock status online.
If the time clock is online, you can skip the remaining steps.
Assign a Static IP (Optional)
-
Press “M” to open the menu.
-
Go to Comm > Network.
-
Enter:
-
IP Address (Static)
-
NetMask (Subnet Mask) (default:
255.255.255.0) -
Gateway IP (Router’s IP Address)
-
DNS Server (use Gateway IP if unsure).
-
-
Save settings and exit.
Check Connection Status
Once connected, the time clock status in the web app should show:
✅ Online (Green Check Mark)
Need Help?
If you encounter any issues, contact NextGen Workforce Support.
📞 Support Link: NextGen Workforce Support


