How to Setup Kiosk and Webclock Terminals
Overview
Kiosk/Webclock terminals streamline employee attendance tracking by providing a user-friendly interface for clocking in and out, managing breaks, and ensuring accurate timekeeping. This guide walks you through the steps to configure these terminals efficiently.
Prerequisites for Setting Up Kiosk and Webclock
Before configuring the Kiosk or Webclock terminals, ensure that:
-
Your NextGen account is properly set up.
-
Employees have appropriate login credentials.
-
Access privileges are assigned to authorized users.
-
A stable internet connection is available.
Steps to Configure Kiosk and Webclock Terminals
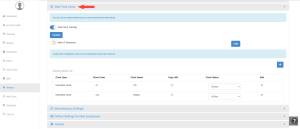
1. Accessing Web Time Clock
Navigation: Dashboard > Settings > Web Time Clock
Click on “+” to begin setting up a new Kiosk.

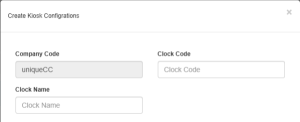
2. Enter Company and Clock Information
-
Company Code: Automatically generated during the initial setup and remains the same for subsequent kiosk creations.
-
Clock Code: Unique identifier for the terminal.
-
Clock Name: Assign a recognizable name for easy identification.

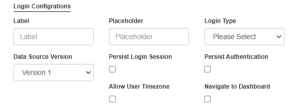
3. Configure Login Settings
-
Label & Placeholder: Customize login fields as needed.
-
Login Type: Select the login method from the following options:
-
Employee Number
-
WebClock PIN
-
BambooHR SSO
-
Username & Password
-
Timeclock PIN & Password
-
SSN
-
Employee Number with SSN
-
Employee Number & Birthdate

-
-
Additional Settings:
-
Persist Login Session
-
Persist Authentication
-
Allow User Timezone (If users operate in different time zones)
-
Navigate to Dashboard. (If users should be redirected post-login)
-
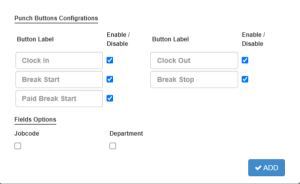
4. Configure Punch Buttons
Enable or disable clocking options based on your organization’s policies:
-
Clock In
-
Clock Out
-
Break Start
-
Break Stop
-
Paid Break Start (If applicable)
5. Enable Additional Fields (Optional)
-
Job Code (If employees need to assign hours to different job roles)
-
Department (For department-based tracking)

6. Finalizing the Setup
Once all settings are configured, click ADD to save the terminal setup. The new Kiosk/Webclock configuration will be available for employee use immediately.
How To Assign Kiosk to Employees
You can refer to this article regarding How to Assign Kiosk/Webclock to Employees
Configure IP Restriction
-
Add comma-separated IPs to restrict access so employees can only connect from authorized IP addresses.
-
This ensures that employees cannot punch in or out from unauthorized systems.

Customer Support
For further assistance, contact customer support:
-
Email: support@ngworkforce.com
- Customer Support: Raise Ticket
-
Live Chat: Available on the Dashboard
-
Help Documents: NextGen Help
By following this guide, companies can efficiently set up and manage Kiosk and Webclock Terminals, ensuring smooth and accurate time tracking for employees.


