
How can we help?
How to Setup account with Intuit QuickBooks integration
Integrating NextGen Time Tracking with Intuit QuickBooks is quick and easy, requiring no specialized IT setup. This Single Sign-On (SSO) integration allows seamless authentication and workforce management.
Follow these steps to set up your account:
Step 1: Sign-Up Process
- Click here to sign up.
- Select “Create Account” and complete the registration.
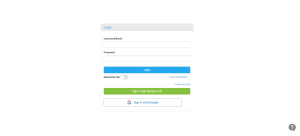
- After signing up, you’ll be redirected to the login page.
- Enter your email and password, then click “Login” to access your account.
Step 2: Configure HR/Payroll Partner Integration
- Click the “Settings” menu in the left bottom of Dashboard in your NextGen account.
- Locate “HR/Payroll Partner Integration” in the settings.
- Under integration options, select “QuickBooks” or “QuickBooks Online” for Employee & Payroll Management.
Step 3: Authorize Integration with Intuit QuickBooks
- After selecting QuickBooks in Step 2, click “Connect to QuickBooks” from the Dashboard.
- You will be redirected to the QuickBooks sign-in page.
- Enter your QuickBooks account credentials and sign in.
- Once logged in, confirm the integration by clicking “Authorize.”.
Step 4: Sync Employees with QuickBooks Online
- Log in to your NextGen Workforce account.
- Navigate to the Employees menu.
- Click on “Employee Sync (QuickBooks Online)” to import employee data.
You have now successfully set up your NextGen account with QuickBooks!
For further assistance, feel free to reach out to our support team!


