How to Create Schedules
Overview
Efficient employee scheduling is essential for managing workforce operations, ensuring proper shift assignments, and improving communication. NextGen Workforce provides a comprehensive scheduling tool to streamline this process.
Before You Start: Prerequisites for Scheduling
Before creating schedules, the following prerequisites must be met to ensure smooth scheduling and proper communication:
1. Employee Information
Ensure Employee Contact Information is Updated
-
Email addresses and mobile numbers should be correctly entered for employees to receive notifications about their schedules.
2. Worksites
Worksites Should Be Created and Assigned
-
If employees work across multiple locations, create and assign them to respective worksites for better team scheduling.
3. Job Codes
Assign Job Codes to Employees
-
Define job codes and assign them to employees based on roles and responsibilities to ensure job-specific scheduling.
4. Departments
Assign Employees to the Right Department
-
Employees must be categorized by departments for better organization.
-
If integrated with BambooHR, department syncing happens automatically.
5. Groups
Organize Employees into Groups
-
Employees can be grouped based on their skill set or hierarchy, reporting to one or multiple supervisors.
-
Groups help in scheduling teams at a mass level.
6. Shifts
Use Predefined Shift Templates
-
To save time, create predefined shift templates that:
-
Automate break calculations.
-
Follow shift logic automatically.
-
-
Check Article on “How to create shift in your online account“
How to Create Different Levels of Schedules
Schedules can be created and filtered based on employee categorization.
1. Employee-Level Assignment
Assign Schedules to Individual Employees
- Log in to Nextgen Workforce
-
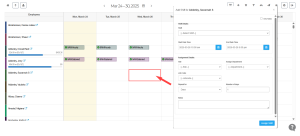
Navigate to the Scheduling Calendar.

-
Select the date for which the schedule is needed.
-
Click on “+” in an empty cell.
-
Choose a predefined shift template or enter a custom shift time.
-
Select the Worksite, Department, Job Code, and define the number of days for schedule repetition.
-
Click “Save”.
2. Mass-Level Shift Schedules Assignment
Assign Schedules in Bulk
-
Navigate to the Scheduling Calendar.
-
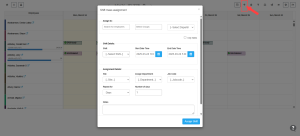
Click on the “+” icon.
-
Select the shift or a free-flow time frame for a flexible schedule.
-
Assign the Worksite, Department, Job Code, and define the schedule duration.
-
Click Save to apply changes across multiple employees.
For Detailed article, on Mass level Scheduling click on : How to assign Shift to employees.

Types of Shift Schedules
NextGen Workforce provides two primary shift scheduling methods:
1. Template-Based Shift Scheduling
Uses Predefined Shift Logic
-
Employees follow a fixed shift template with predefined breaks, shift timings, and logic.
-
The system aligns punches with predefined shift rules.
2. Free-Flow Scheduling
Flexible Scheduling Without Logic Constraints
-
Used to notify employees and schedule them without predefined logic.
-
Employees work based on a time frame instead of a rigid schedule.
How to Publish Schedules
Once schedules are created, they must be published for proper communication.
Steps to Publish Schedules:
-
Navigate to Schedules.
-
Click on Publish after making schedule assignments.
-
Employees will receive a notification via email.
-
Employees can sync schedules with Google Calendar or other scheduling tools.
How to Filter Schedules
Schedules can be filtered based on assignments, departments, sites, and groups.
1. Schedule Filter
Sort schedules based on shift assignments.
2. Employee Filter
Filter employees by:
-
Departments
-
Sites
-
Groups
This helps in refining workforce schedules and viewing specific teams or job roles.
By following these steps, you can efficiently create, assign, filter, and publish schedules in NextGen Workforce. As a result, managing workforce schedules becomes much easier and more streamlined.
For additional assistance, contact support!


